Let me give you a little background about what Cantaloupe is because when I was doing my research, I used the term “Melon” and it brought me to pages and pages of watermelon instructions. That’s when I found out that what we know as “Melon” here in the Philippines is more properly called Cantaloupe in general. Here’s what a Cantaloupe is according to Wikipedia:
The cantaloupe, rockmelon, sweet melon, or spanspek is a melon that is a variety of the muskmelon species from the Cucurbitaceae family. Cantaloupes range in weight from 0.5 to 5 kilograms. Wikipedia
Scientific name: Cucumis melo var. cantalupensis
Higher classification: Muskmelon
Subspecies: C. melo subsp. melo
Rank: Cultivar
Okay, so a month ago, we bought some Cantaloupes, or better known as Melon in the Philippines (not to be confused with watermelon) from the supermarket. Mahal turned it into a Melon shake and refrigerated the whole batch. I enjoyed our Melon shake for a few days. I’d always get a glass of it from the fridge and sip on it while I work.

This is me enjoying a glass of our Cantaloupe / Melon shake at home.
After Mahal turned it into a shake that day we got home from the supermarket, I didn’t throw away the seeds. Like what I’d usually do to my lemon seeds, I didn’t even bother drying them anymore. Instead, I did these steps so I can grow them from seeds:
STEP 1: I put the seeds on a clean, dry kitchen tissue paper.

STEP 2: Apply a disinfectant solution.
I folded it and poured a bit of my home-made disinfectant solution (500 ml of mineral water and a teaspoon of hydrogen peroxide), just enough to get the tissue wet and to make sure that the seeds won’t rot and mold.
STEP 3. Keep it in a plastic bag.
I then put the folded tissue with the seeds in it inside a clean plastic bag.
STEP 4: Keep it somewhere dark.
I kept it somewhere dark in the house, usually inside a paper bag, behind our mirror, coz that’s where I put stuff that must be brought to my shed on the farm.
STEP 5: Plant them in seedling bags.
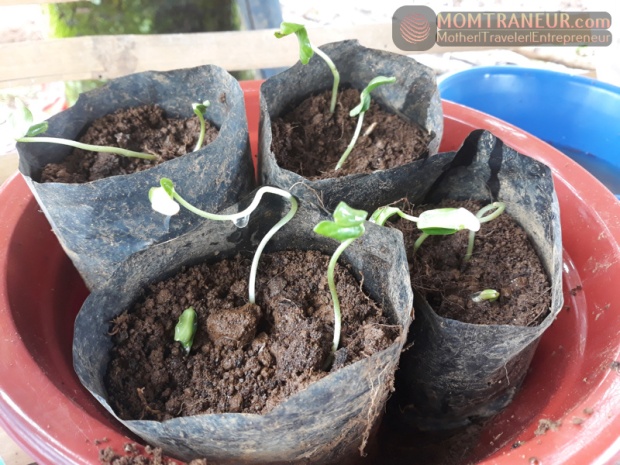
After about 3 weeks, I’ve actually already forgotten about it until I saw it in my shed at the farm. Mahal brought it there for me to plant them in nursery bags.

I didn’t recognize the little sprouts at first. I thought they were from the lemon seeds I’d usually grow from seeds. So I looked at where the leaves and roots sprouted from more closely and saw the shell of the seeds. They were from the melon seeds I kept three weeks ago. They have now sprouted! I’m so happy!

So I prepared my soil mixture (soil, chicken dung, vermiculate with a ratio of 7:1:1) and transferred the sprouts to a used seedling bag (because it’s good to recycle!) and kept them in my farm shed for another week. The nursery bags we have at the farm were not so small and were a little wide. So I planted 2-4 sprouts in one seedling bag.


Step 6: Once they’ve grown a bit, replant them on a vegetable bed.
Then yesterday, they have grown taller, I was afraid their roots might get so intertwined under the soil, I might have a hard time transferring them to a bed later on so I just immediately transferred them to a prepared vegetable bed I have at the farm.

I have a total of 11 successful sprouts from all those seeds I originally put in the tissue paper a month ago. During my research, I read that they should be planted about 5-7 feet apart because these plants crawl. But since I only have a few ready beds, 2 of which were currently being planted with sibujing, lemons and strawberry, I just made do with whatever space I have left. Instead of planting them 5-7 feet apart, I planted them about 2-3 feet apart. If they crawl too much, I’ll just put sticks where they can crawl up. For now, my 3 year-old son and I placed little rocks around each of the little Canataloupe / Melon plant so our caretakers will know not to pull them out coz they might mistake them for weeds!


We’ll see how this will pan out in the next several weeks. We’ll be gone for about 2-3 weeks because we’re heading off to Oslob next weekend so at least there’s something to look forward to when we get back. I’m actually excited!
For now, my little toddler is helping me water them. Teehee.

Until then!
If you’re into planting vegetables but you don’t have a big lot, you can check out my INDOOR FARMING posts! That’s how I cultivated my love for planting vegetables almost a decade ago. Just choose from my posts below:
HOW TO START YOUR OWN VEGETABLE GARDEN AT HOME THE AFFORDABLE WAY
HOW TO GROW WATER SPINACH (KANGKONG) AND CHINESE KALE (KAILAN) THE EASY WAY
HOW TO GROW PEPPERS THE EASY WAY
HOW TO GROW EGGPLANTS THE EASY WAY
HOW TO GROW OKRA THE EASY WAY
HOW TO GROW TOMATOES THE EASY WAY
TODAY’S HOT TIP:
“Turn intentions into actions and actions into results.” – Manchovian Prince
See you tomorrow!


Great
LikeLike
Thank you! ^_^
LikeLike